In CADworld with it's non or semi intellegent lines, blocks, classes, property set definitions, etc. tagging items non-numerically was the norm for some of us and since we had to (some still have to) use (now in my opinion, waste) that time (sometimes days) creating Schedules in their CAD based projects. Again, those are really lost hours manually inputting text into schedules or creating data sets to the 'enth degree'; yet it's mandatory in the CAD packages I know of (sorry ADT, you too). Well...Not in Revit!!!
Firstly, in Revit I actually like to simply allow doors be numbered as they will be; thus not making extra "busy" work that doesn't necessarily impact the Architecture in a positive way (That is why I am here, right? the Architecture?! oh yeah I remember) -Although, I have a dirty little secret: I too renumbered my doors in the past, based on levels (100's, 200's etc.) but am doing well in my CAD Standards Therapy sessions and I'm coming up on my One Year of CADsobriety soon!!!
As i said previously: here's a solution for you to get that particular door-numbering-by-room standard put into Revit...where it will be coordinated; though you may have to help it along when adding new doors or removing others, etc. Also: Revit will try it's best to continue the numbering you last used so be aware of what you and Revit do...So finally:
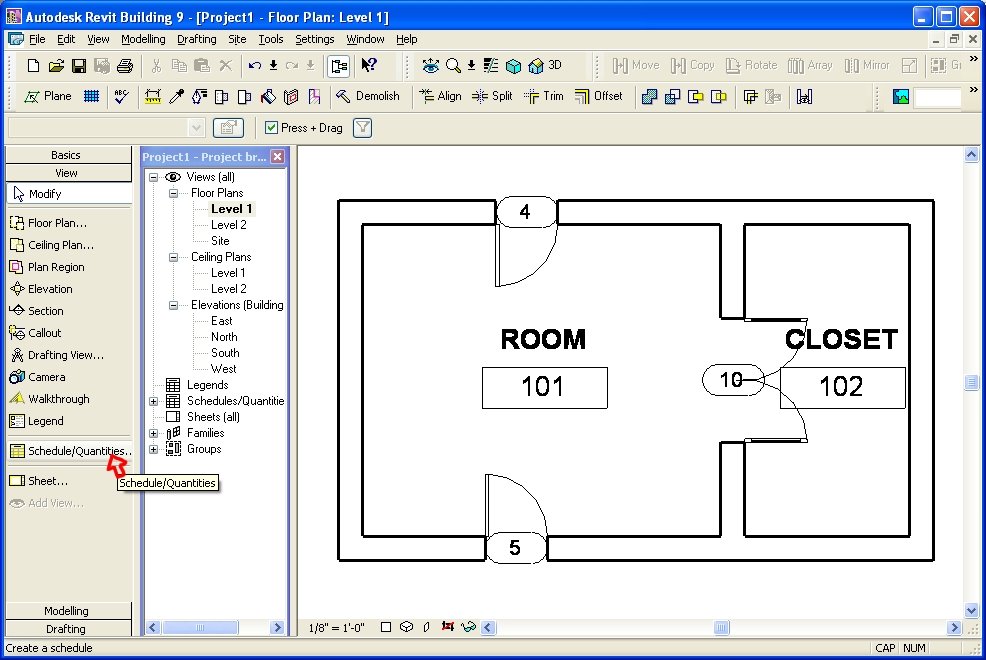
Our first image is a sample project with Doors tagged and Rooms placed:
 Now we are ready to create a Door Schedule View: Our next image illustrates the beginnings of such. Add fields as you need from the "Doors" Fields...reorder them as needed...
  What we do now is: Be Curious...select the "From Room: Number" field.
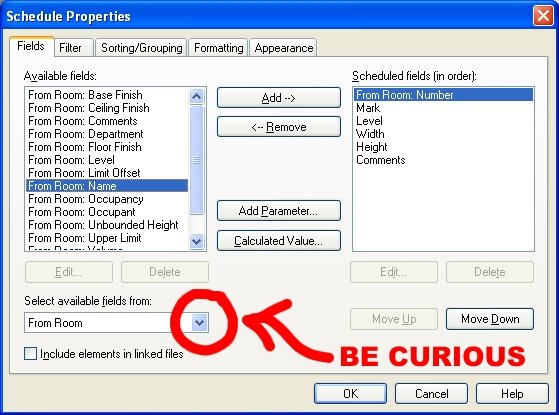 Then the "To Room: Number" field (Remember to re-order them as or if needed)
 Now filter/sort/format and change the appearance settings if you need then complete the view...
Next, renumber the "Mark" fields in the newly created schedule, according to your preferences...(Yes, this writes back to the actual door!!!)
 But before we go there are a few "hidden" items...specifically "columns" that need hiding! Select the two 'Room ' columns, Right click and this is what you will see...yes choose to hide them!!!
 After hiding these columns (yes, the schedule view can be right clicked at any time in the future, thus giving the choice to "show" them again, at any time...YEAH). Now we just need to place it all on a sheet and voila...Numbers by Rooms...Nearly automatic...And remember...we can do this once and save into our project templates and use it over and over!!!
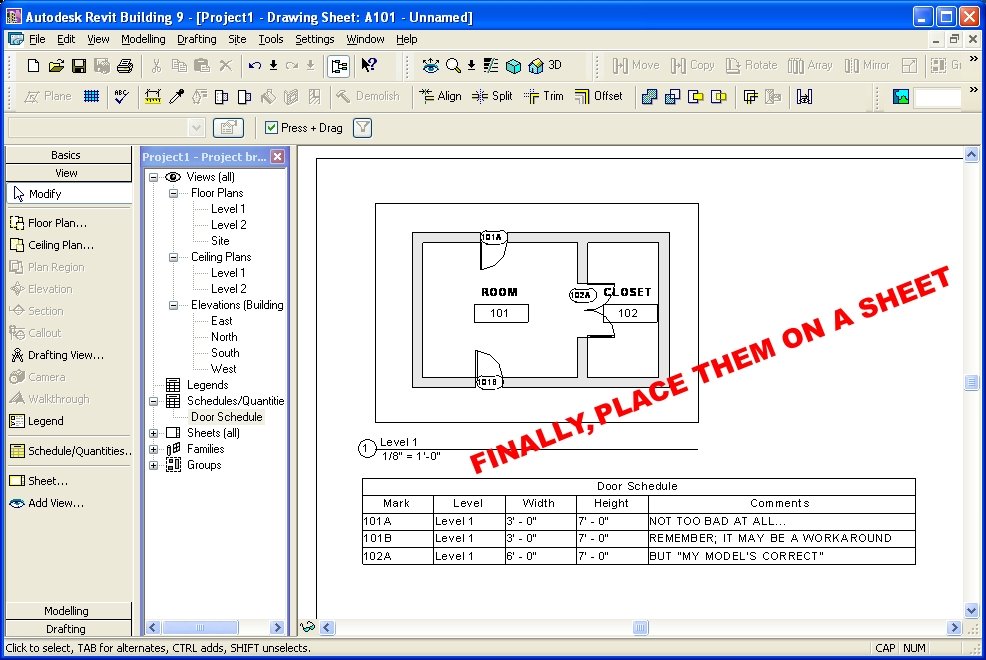 Take care!!! Thanks Daniel.
-J
How about room numbers for rooms with multiple doors?
ReplyDeleteI hope that whoever the 'anonymous' person is that left the last comment is better at Revit than at humor!!! Unless, of course it was a typo, in that case then I would say: What the ____ do you mean?
ReplyDelete-J
... renumber the Mark fields ....
ReplyDeleteBY HAND?
And what will I do if I have more than 500 Doors.
Christian,
ReplyDeleteIf you get Avatech's tools you can use the door update tool and make that SOOOOOOO easy!!!!!!!!!!!!!
Look at this post and you'll find a link to them and more.
http://cad-vs-bim.blogspot.com/2009/06/current-revit-tools-and-addons.html
ReplyDelete