Printing PLT files using Windows XP
The following alternate (and free) method explains how to set up Windows XP so that you can send a plot file to your plotter directly from Windows Explorer. This should also work with Windows 2000, although we have not tried to do so. (And since it's outdated by nearly a decade who cares -J) This procedure will add a selection to the context menu when you right-click on a PLT file that will send it directly to your plotter.
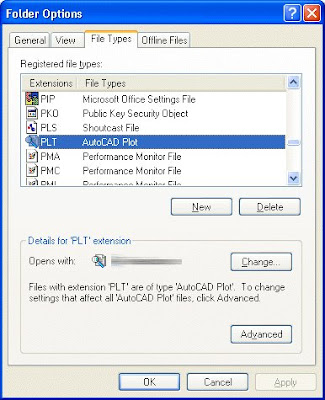
1. Open Windows Explorer and from the Tools menu, select "Folder Options..."
2. On the Folder Options dialog box, select the "File Types" tab and select PLT from the list of registered file types.
 3. Click on the "Advanced" button to modify the actions for the file type.
4. Click on the "New..." button to create a new action.
5. In the "Action:" box, type a phrase to describe the action. This is what you will see in the right-click context menu, so make sure it is something you will easily recognize. Since I use this command to send the plot file to my HP DesignJet 1050C, my action is called "Send to HP 1050C".
In the box for "Application used to perform action:" this procedure uses the cmd.exe program, which is how Windows XP emulates the old MS-DOS prompt. What you enter in this box will depend on how your printer is connected to your computer or network. Choose one of the following options:
A. My plotter is connected directly to my computer.
Enter the following into the Application box:
cmd.exe /C "copy %1 lpt1"
Here, lpt1 is the name of the printer port to which the plotter is connected.
B. My plotter is shared on our network through another computer.
Enter the following into the Application box:
cmd.exe /C "copy %1 \\server\printer"
Here, the name of the computer to which the plotter is connected is "server" and the name by which the plotter is shared on the network is "printer". Change these names to suit your particular setup.
C. My plotter plugs directly into our network and has its own IP address.
Enter the following into the Application box:
cmd.exe /C "lpr -S192.168.1.40 -Praw -o l -d %1"
Here, "raw" is the name of the queue on the plotter, which is typical for most plotters so you shouldn't have to change that. The 192.168.1.40 is the Internet Protocol (IP) address of the plotter, which you will need to change to your particular plotter's address.
6. Click "OK" on all the windows, and you're done! Now you can right-click on an AutoCAD PLT file and send it directly to your plotter.
Now all that's left is to ask WHY!!! Oh, and send the prints to the client; or better yet leave them on the printer for a month like "That" person in the office...
Take Care!!!
-J


not usefull.!!!
ReplyDeleteWorks Great!!!!!
ReplyDeleteThankx!
he was banned from recreational computer use and was slated to serve a six-month sentence under house arrest with probation.
ReplyDelete